I actually wrote this a few weeks ago but just now got around to posting it...
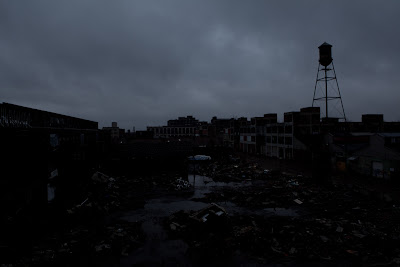
A large print of one of my favorite Packard shots was picked up by the customer yesterday. She was delighted by it and her husband, who received it as a gift from her, loved it. It's now hanging on the wall in their den.
A large print of one of my favorite Packard shots was picked up by the customer yesterday. She was delighted by it and her husband, who received it as a gift from her, loved it. It's now hanging on the wall in their den.
I thought I'd outline the process this photo went through from capture to wall, just in case anyone cares. More goes into these things than most people, especially customers, realize.
This print sold for more than I've ever sold a print for, almost $600. Of course, there were some costs so I netted less, but I would love to get more into selling my photos like this. Wouldn't we all, LOL.
The photo in question is named "Devastation" on Flickr but I much prefer the name "Ghosts of Packard". GP was taken on an overcast and rainy morning on March 14th, 2010.
Here's the location it was taken from, on the second or third floor of this southern building inside a room that looked to have once been a tool shop. The red lines are approximately the field of view.
The photo was shot using a Canon 5D mk II and 24-70L f/2.8 lens. I used a tripod and shutter release to avoid alignment issues. Three shots were taken across most of the dynamic range of the scene. All shots were captured into 21MP RAW files. The final composition is an HDR of the three shots seen below. HDR is great because I can use the shorter exposures for the sky and the longer ones for the shadow detail.
Post processing was as follows:
- Import and catalog in Adobe Lightroom. Apply keywords, rename files, and back up to two external sources.
- Do initial edits in Lightroom consisting of contrast and color adjustments, including about 90% desaturation of all colors.
- Combine exposures in Nik HDR Efex Pro software using various adjustments to control tone mapping and dynamic range compression.
- Upsize to 26.5x40 @ 300 DPI final print size in OnOne Perfect Resize. This is the same software ad designers use to upscale photos for billboards, it uses fractal geometry to replace patterns with higher-resolution versions.
- Import into Photoshop and perform manual edits - things like enhancing brightness to create a path for the eye along the muddy water in the foreground, darkening some areas, removing halos caused by the HDR process, and beating back distracting elements. I also removed the lettering from a couple of prominent signs.
- Flatten image and Export to JPG file. This is the first time in the design cycle the photo has lost data, due to the lossy compression of JPG format. Not much though, you'd never be able to tell.
- Upload to print supplier, in this case White House Custom Colour in Minnesota (yeah, the British/Canadian spelling is correct).
- Order pigment print on 100% cotton rag mounted to foam-core board. This is very large for a pigment print but I cannot describe how gorgeous these prints are. Nothing at all like the common wet-process glossy or luster prints. Ultra-flat and you can see every detail, down to the rivets in the plant beams.
And these prints will last 200 years if framed correctly.
Framing and matting was a challenge due to the oversize nature of the photo. Standard matte sizes were too small so I had to custom order a 40x60 oversize matte from a local art supply place (40x60 is too large for UPS to ship, no matter that it's only a couple mm thick).
I selected an extruded aluminum frame with a satin finish to complement the metallic nature of the subject without distracting.
The matte I chose was charcoal, it looked the best and provides a good dark border to showcase the print. I used a single matte, width 2" all around. I just wanted a dark border and nothing fancy.
I used plexi glass due to the high cost of glass this size, and also because nobody ships glass like that. Also weight is far less. I briefly investigated "museum glass", a low-iron UV-blocking glass that is optically pure white and has virtually no reflection, but it's crazy-expensive. It would have cost close to $500 for a piece of museum glass that size. The plexi, though not nearly as white or anti-reflective, was $48.
I put the whole thing together (with Heather's awesome help) using pH-neutral tape and installed a hang-wire. Here's a pic of the final assembly:


1 comment:
Congratulations! Awesome result and flattering price, not to mention great photo!
Post a Comment